Showing posts with label DIY projects. Show all posts

Thursday, February 4, 2016

Buying Milk Paint: Along the Way

Hello readers!

Continuing with my previous post, I did go to pick up my Miss Mustard Seed Milk Paint on Wednesday. It is sold at SuzAnna's, the larger shop at Vintage Village, which consists of several booths run by different vendors. This shop is the furthest away from the parking lot, so "along the way" I couldn't resist taking these photos.

Two Old Birds,
a great shop where I buy...


...all of my Annie Sloan Chalk Paint...


always has cute little things out in front...


and a black bird on the fence. 
But alas, no chalk paint this day.
Keep walking, Sue...


Another shop.
Not sure of the name,
but a sweet little building
chock full of great finds...


Also along the way,
a section of salvage from an old farmhouse...


And finally, I got to SuzAnna's,
where there was this very creative
display of old hankies...


...and then some...


...more...


Another booth featured this lovely
bird assemblage.
Why can't I be this creative?...


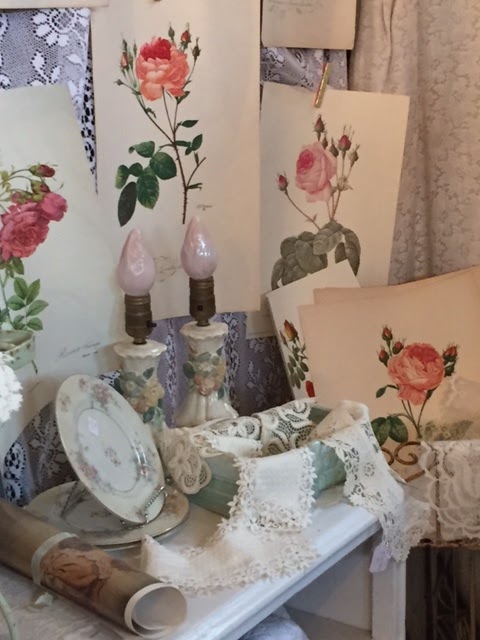
This was from a lovely booth
that was just re-done to feature
pink things...


And this display in another
shop featured purple,
even the cowgirl boots!!...


Here are some lovely sachets.
They were wrapped in cellophane,
so didn't photograph too well,
but gorgeous nonetheless...


And some glittery lavender birds
in a chippy iron bowl...


...with one on this pretty plate...


But I stuck to my target, 
forged on to my real destination
and purpose of my visit
(to spend my Christmas gift certificate)...


...and bought my Miss Mustard Seed Milk Paint
in Farmhouse White!
Along with a stirrer, since this paint comes in
powdered form and you mix it yourself.
And some bonding agent so that the
paint will cover the highly varnished 
piece of junk dresser that I will use it on...


Oh, of course some wax
and a waxing brush...


Bye-bye gift certificate!
Hello painting adventure!

Do you have any furniture that you will re-finish?
Have you used MMSMP?
If so, I'd love to hear about it!


Tuesday, November 24, 2015

The Farm Table and a Couple of Procrastinators

Good morning.

If you read this blog, you may remember that a while ago a LONG while ago, I went to one of my favorite antique stores, showed you some photos of my day out, and asked you to guess what item in the photos was something I actually came home with. You can see that post here.

Well, last March my DH decided that he was bored with the winter and tired of being stuck inside. If you are a mom, do you remember when your kids were little and kept telling you how bored they were? After a while it started getting aggravating and so you FOUND them something to do, like clean up their rooms or write a book report (can you tell that I was a young mom back in the day when there were no iPhones, iPads, or computers to play games on?). Well, Hubby kept on with it so finally I said: "Well, why don't you just build us a farm table!". Bad mistake. That afternoon he went out looking at wood and other materials, came home, told me to go over the dimensions with him, and bought the materials the next day. This was a month before we had planned on beginning work up at The Nest. Needless to say, the table got built, I Annie-Sloaned the skirting and legs, along with the six antique chairs that I bought, four in one place (one of which is seen in last photo on the linked blog post above), and two in another. All that needed to be done was to stain the table top and wax the chairs. And there they all sat. In the garage. (Along with two old dressers that I bought almost two years ago and still haven't refinished.) Who uses garages for cars anyway? Ha. We spent so much of the spring and summer working on the other place, that the table simply took a back seat.

So, last week we decided that we want to get moving on our farmhouse look, and that it was time to finish our my project, and there I went. In two days I stained and polyurethaned the top and waxed all the chairs. Yesterday we lugged out the old table and chairs (Craigslist here they come) and put them, where else, but in the garage, and dragged in the new set. We are really pleased with how it came out. We did it on a budget, which was the best part!

Most of our furniture is dark,
and we are trying to lighten it up a little.
Since our dining room is part of the open concept,
and not a formal dining room,
our current table just doesn't work.
I bought it before I met Bob when I did have a
formal dining room.
Goodbye...


...and hello dear sweet farm table...


We will be painting this whole area after the
 holidays, and have something in mind to 
replace the plates on the wall...


Here is a better shot of the top of the table.
The stuff on the table was a bargain.
The Thanksgiving greenery was 80% off at 
Hobby Lobby the other day,
and the candle holders were from our 
outdoor wedding six years ago.
Such a bargain!...


We are currently doing some work in our great room...more on that in a future post. Hopefully, though, not too far in the future. We do tend to procrastinate sometimes!

Are you doing any DIY lately?

Friday, November 20, 2015

Quick Tips from The Wren's Nest

I'm Good morning!

This is a good news day for you. There will be no more posts about The Wren's Nest until at least next April. I can hear you clapping already!

Just a couple of last notes, well, actually tips. As you well know by now, my husband and I are DIY folk, but by no means professionals at anything we do. A lot of what we get accomplished comes by way of learning by our mistakes, or, more often than not, by just fixing our mistakes.

Here is one of them, with a workaround that turned out kind of pretty.

When we were cutting the paneling for the 
bathroom (see earlier post),
we obviously didn't measure correctly
to account for the electrical outlet.
Not once, but twice!
At this point, we were running out of paneling.
So, I thought about what I could create
to cover this boo-boo...


This is a larger outlet box than normal.
The only switch plate that we could find
to fit it and cover the mess was this type,
but we didn't need the part of it
that was cut out for the switch...


I brought the switch plate to Walmart,
where I found this lovely and inexpensive
frame, making sure that the switch plate 
would fit inside of it...


I then covered the switch plate
 with pretty scrapbook paper
following and adapting a tutorial that I found
through Pinterest (what else?!),
coated it with Mod Podge,
and added a vintage rhinestone button
to hide the switch cutout...


This is what the switch plate then looked like
on the back.
I glued the button on, and also
 fed a small piece of wire through the
back of the button, taping the ends to
the back for added stability.
At this point the switch plate was not glued to the
frame or burlap mat that came with the frame.
When we actually got ready to hang this all up
we decided that there was no reason to use the
mat, and it would have gotten in the way
of everything...


This is how it looked from the front...


We screwed the switch plate to the wall, 
using the one screw on the right 
that was needed for the actual outlet.
The two screws by the button were 
just glued in for effect.
The frame was then attached to the wall 
separately with wood glue,
upside down so as not to interfere with 
the molding...


(Before hanging it up, Hubby did replace
the outlet with a new white one.
We have this thing about ugly old 
outlets and switch plates.)
Too bad for this bad photo!

Who said that switch plates can't be
beautiful!

**********************************

And here is one quick tip. Have you ever tried to spray-paint kitchen cabinet knobs and gotten frustrated with the fact that they keep rolling around? You might find this helpful.

Original knob...


Punch holes in the bottom 
of an egg crate,
insert the knobs, and
spray away darlings!...


Ready to be hung,
and so much cheaper than buying new
ones!!...


Norm Abram and Martha Stewart have nothing on us!!

Monday, June 30, 2014

I feel old, and a refinished patio table set for Birdsong Cottage...

Good morning. I feel old today. Not because I have any new aches and pains, but because my firstborn turns 38 on this day. I will not mention how old I was when I had her. For obvious reasons.

While Mr. Perch put the finishing touches on the front door at Birdsong last week, I also completed work on the old patio set that I bought in Raleigh a few months ago. We had hauled it up when we came up in April to open the place for the season. Of course, I still didn't get around to painting that trim work!

I had previously painted the frames of the table and chairs back at "real house", and you can see that post here.

You may recall what the furniture looked like before,
shown here at SuzAnna's Antiques...


I painted the old vinyl cushions, again, with 
Annie Sloan Chalk Paint in Old White (my go-to color).
In the photo below, I have started to brush on the paint
over an old rust stain that was likely from an old bucket
that someone left on the chair...


After two coats of paint, this is what the cushions
looked like...


And here is a finished chair,
seen with that lovely carpet mentioned in yesterday's post...


Don't you just love it when a plan comes together in such a cheap way?
I hope you have a great day today!


Sunday, June 29, 2014

A new front door for Birdsong Cottage...

Hello to all!

It was my intent last week to paint all the trim work up at Birdsong. Have you ever noticed how things rarely go as planned? The day after we got up there, Mr. Perch decided that he wanted to replace the front door, since he never liked the old one. So, we went to the local mobile home supply place, picked out a door, and came home to measure. He then went back, paid for the door that we liked, and brought it home.

Hubby is someone that once he decides to do something, he works on it until it is finished. Without eating. Without going to the bathroom. Without regard to the fact that I had planned on doing something else. But that's OK. I guess.

The funny part is that last summer when I was painting some very hard to reach places in the top cabinet above the broom closet (no one had every painted back there, as the original old 60's dark brown paneling was still in its original state), I found a small plastic bag nailed to the wall. When I took it down to see what was inside (worrying that I might be bit by something), I found the business card of the original salesman that sold this mobile home when it was new, along with a spare key that opened all the doors. And still did when we bought it. Can you believe that no one had changed any of the locks in 45 years? Well, leave it to us. New door, new lock. But certainly not because we were afraid of a break in. I imagine that if the locks never needed to be changed, there were no worries in this quiet little mountain community.

So, back to the door.

The old one, which opened to the inside,
blew open if the deadbolt wasn't secure,
and hit the back of the chair behind it
every time we came in ...


The new one, which opens to the outside.
This photo was taken before we 
installed it.
We did get a new doorknob and deadbolt
in, what else, but oil-rubbed bronze,
but of course I forgot to take a photo 
of it and the door after installation.
Next time!... 


Better photos next time I hope. Have you ever noticed that husbands have mega patience for accomplishing their feats, but not so much while we take photos of everything?

Have a great day!

Saturday, June 28, 2014

Prettying up old lawn chairs at Birdsong Cottage...

Hello friends. We are now home from Birdsong, so I thought that I would share a little of what we did up there last week.

When we bought the place last year, part of what was included were two lovely lawn chairs in the porch. You may recall their ugliness from one of my posts last year, but just in case you are a new reader, here is a glimpse of what they looked like. One was a rocker and one was not, but they were a matched set, with...

...ever so stunning lime green, black,
 and lemon yellow woven plastic cushion
covers. 
If you are in my age group, you may remember
this color scheme from the early 70's.
Perhaps they were original to this old house. 
I mean this old single wide...


And of course, they had "marvy" old, and very pitted,
aluminum frames.
We were initially going to throw them out,
but they served us well during the remodeling last year.
And were ever so comfortable to boot.
I couldn't bear to be the one to disrupt the chain of
ownership of this stunning couple.
So, like any thrifty all-American woman,
I took out the spray paint and let it rip on the frames... 


...using my ever so trusty Rust-Oleum 
in Metallic.
Which is the WalMart's version of the 
Oil-Rubbed Bronze from the home store
(I forget whether Lowe's or Home Depot)...


And for the cushions, I decided to try Annie Sloan
Chalk Paint in Old White.
It was certainly easier than recovering them,
and would fair better in the humidity.
I hope.
Below you see it as I brushed on the first coat.
I really made sure that I 
worked it into all of the mesh...


After I put a second coat on all sides 
of the cushions,voila!
Here is the finished product.
The cushions now look like they have been
covered in duck cloth.
And they are soft and supple... 


The only drawback now is that the cushions
no longer match the charming old green
AstroTurf porch carpeting. 
Do you remember that stuff?
I guess you can't have everything.
Not all at the same time, anyway!

Now doesn't this just make you want to go out and try to find some comfortable old lawn chairs from days past? Have fun looking!