Showing posts with label single wide mobile home decor. Show all posts

Sunday, April 30, 2017

Assemblage Art: "A Little Bird Told Me"

Good morning friends and happy Sunday!

We returned home earlier this week after 10 days at The Wren's Nest, and it has taken me this long to catch up on laundry and garden work, so here I am at last. Doesn't it seem like there are never enough hours in the day?

We finally hung up an assemblage piece that I started a while ago, and finished over the winter.

Here is the piece, which has been hung
next to the window in the living room.
We actually managed to get in the last
two new windows this trip.
More on that saga later this week!
You may recall that we had completed
16 of the 18 but work came to a
standstill last June when the issues
started with the Mister's foot.
We even put up our first curtains,
which are a little more "printy" than
what I would used here at home,
but "cottagey" enough for this place
without being too cute!...


This was a generic Michael's wood shadow
box that I originally purchased for I-don't-know-
what and painted with Waverly Chalk paint
from the craft section of Walmart.
The color is "plaster".
The inside of the box as purchased
was lined with beige fabric.
Of course, its so hard for me to create
something without using an old photo...


The feathers were found in our yard some
time ago. As I always do with found feathers,
I placed them in a zip lock baggie with
bug spray, sealed it shut, and let them
sit in there for a while, ensuring that any
mites on the feathers would be dead.
The nest was a vacated real one found up at
The Wren's Nest when we cut down some
old bushes up there, and was also treated
the same as the feathers.
Because it was crumbly,
I sealed it with spray acrylic
and carefully glued it to a background
of wax paper to make sure that it
didn't crumble further once placed in the box.
The eggs are little paper eggs that I
think were part of a home decor set once
purchased at Target.
You can read more about the actual nest here...


A copy of some vintage sheet music,
and some paper flowers fastened with
brads,
along with some twigs,
seed pods from daylilies here at home,
and game letters...


But my favorite part is the old rusted doorbell
that I bought a long time ago and was
waiting for the perfect place to reside.
It's all about home!...


What have you been up to lately?
Thanks so much for coming by!


Wednesday, June 29, 2016

Windows in the porch and OOPS!...a slip of the drill...

Hello dear friends, and happy Wednesday!


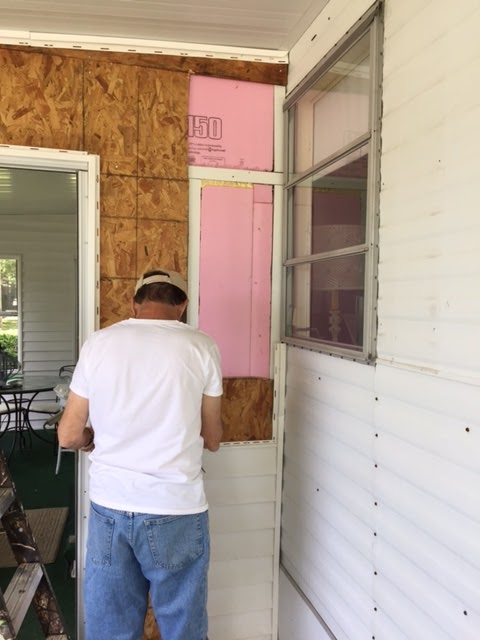
When we were up at the Nest, our last order of windows came in before we expected them to, so Hubby decided to put in three of them, this time inside the porch. Our porch was once a long screened in job, but at some point a previous owner decided to make half of it into a sunroom. He enclosed the back portion and put vinyl siding on it, inside and out (I keep pretending its shiplap, but I don't think I can fool anyone) adding five windows to the outside and a decent door to the front. Its nice because it stays warm in cool weather, but its not so nice because he did a terrible job with the windows (a future project for us will be to fix or replace them) and decided to put the dividing wall and rear wall right over the frames of four of the old house windows that we are trying to replace. I guess his assumption was that those 30 year old aluminum awning windows would last forever.

Mr. Perch simply thrived on the excitement of 
having to remove the siding before he could get
to the old window...


 Well, at least there was insulation under the 
wallboard!...
 

Window out, at last!...


And, the new one is in!
We did also get the siding back up, 
along with the grey wood trim,
but I forgot to take a photo...


And then, we decided to tempt fate and move
to the window inside the sunroom,
on the other side of the wall shown above. 
And... after putting in 15 of the 18
windows with no mishaps,
what should happen but 
OOPS!
a slip of the drill!


Oh, well, at least it was on the old window!

PS...By the way we did get the new window in
without further mishap,
but decided to call it quits for that trip!

Have a great evening.


Saturday, June 18, 2016

New Windows for The Wren's Nest

Hello there!

Well, we are finally putting new windows in this little old mobile home. We opted for ones with grids. They were only slightly more expensive but we thought they were well worth the money as they gave this place more of a "cottage" look. We have ordered them six at a time, because the folks at the nice mobile home place that we go to give us 10% off if we do.

When this place was built 40 years ago, it had the old-type aluminum awning windows, which you cranked open. The good part was that you could leave them opened when it rained, and usually no rain would come in. The bad part was that aluminum pits after time and gets nasty looking. Also, the windows  have so many working parts that some of them become dysfunctional. These are no longer air tight, so water came in and rotted the window sills in areas...


You have to manually swap out the screens and storm windows each spring and fall. And these are fastened on inside with little clips held on with screws, which doesn't make for nice looking window trim.


After all the windows are in, we will be re-framing the insides and installing new trim, which will be painted by moi...


The cranks used to open them is inserted through a hole in the trim, again, not air tight and ugly to look at...


Though installing the windows is not hard in itself, the prep work is time consuming. First, all of the old aluminum awnings had to come down. As with much else in this place, the screws holding them up were old and rusted, some were broken, and a pain it the butt to remove...


Here is the bank of old rear windows in the master bedroom, replete with red tail lights above. Gee, how can you tell that this is a mobile home? You can see how the windows are flanged and screwed onto the structure, a look which we are not fond of, to say the least...


In this picture, actually taken of the old living room windows, Bob is removing the old caulking from under the flanges. New caulking was then put on all of the new ones...


Here we are back at the bedroom windows when one new one was in. What a difference!...


And here all three are in, with the lovely grey wood trim that you previously saw me painting. The trim covers up the screws in the flanges, and looks so much nicer...


Whittling away at this task has kept us rather busy, but it's well worth the extra effort. We've been getting a lot of compliments on the look. At this writing, we've replaced 13 widows, with five more to go. Hip hip hooray! 

Wednesday, June 15, 2016

A New Roof for The Wren's Nest

Hello to all! In my last post I shared some photos of stains on the ceiling of our master bathroom. Since we weren't sure whether or not they were the result of new leaks that occurred during the winter when we were away, or if they were bleed-through from old leaks, we decided not to take any chances and had this place re-roofed. Well, actually, on a mobile home it is called a roofover, which is when a new roof is installed right over the old original one. It turned out that one had already been done here, but it was old, so the roofers removed it and put on the new one in its place. We are very happy with it and it looks really nice. It is called "white", but actually has just the slightest tint of grey to it, so this will work in our favor on our design plan for the exterior painting whenever we get around to it! 

Here are some photos. The roof was put up the last time we were up here. Here comes the load of materials, which included the insulation and steel roof material. Actually, they had enough on this truck to do a couple of other jobs after ours.


Two young men did all of the work. I don't think that I've ever seen anyone work as hard as these fellows. They started at 8 a.m. And worked until the job was finished at 5 p.m., taking no breaks. We suggested that they take a few as it was hot up there, but they said that they would rather work until they were done. Here they are removing the old roofover, pieces of which you see on the lawn. These were later hauled off of the lot by the folks here at the park, and sold as salvage...


In this photo they are getting ready to install the insulation...


...and in this one, the roof is on, and they are installing the trim...


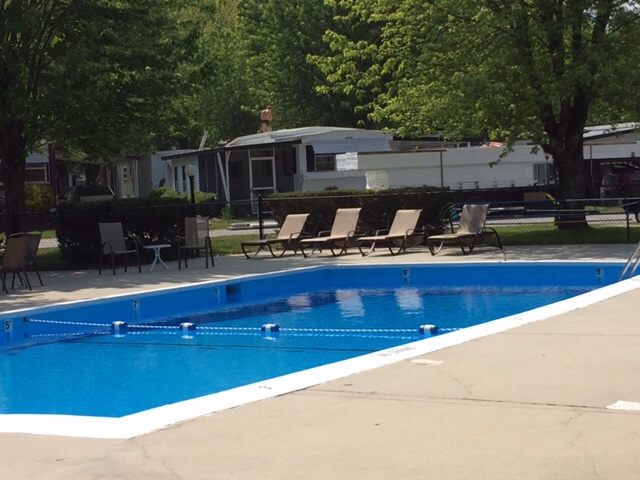
We took,the next two photos from the pool area, which is right across from our lot...


I will soon paint the old black trim (seen on the porch) to match that on the new roof, and this week we are making some other changes to the front. But more on that later!...


In a few of the photos above, if you're very observant, you may notice the biggest change that we are in the process of completing. Something started right before the roof went on, and still being worked on this week.

Have a great day!

Monday, June 13, 2016

The Mums at The Wren's Nest


Hello to all!

Last fall I planted two little mums in the little garden in front of our little mountain getaway. When we got up here on Saturday, we happily discovered that they were in full bloom, and actually bigger than the bushes. Who can figure!


In April I had put in a couple of white petunias, one of which you can see in the photo below, along with one of the daylilies that is just starting to bloom...


I must say, "gardening" here is a lot easier than back home. Not only because it is such a small space, but also because the soil is so much better.

Have a great day!
Sue

Tuesday, June 7, 2016

The Wren's Nest: The Guest Bathroom (Part 2)

Hello!

Moving right along in the saga of the guest bathroom, here is Part 2.

Now we are getting to the fun part,
though perhaps Hubby would not agree.
In this room we had no old paneling to work
with.
You may remember that when we did the master
bathrooms both at Birdsong and in this place,
we only made it LOOK like there was beadboard 
by putting up chair rail molding,
and painting the top of the paneled walls
 a different color from the bottom.
Here there was only old painted wallpaper,
so we put in actual beadboard on the bottom.
Since the old wallpaper was already painted,
I later followed suit with another coat of paint, 
and was actually 
happy with the way it came out.
In this photo you can see how little room
there was to work.
Good for me, as no room in there to help, 
so I got off easy.
Bad for Mr. Perch...


Here the beadboard is in, 
and flooring is being installed.
You can see where he also started sizing
the baseboards in back of the toilet...


The vanity (you may remember that we
bought this last year in Lowe's on close-out,
and stored it in the guest bedroom all winter)
was the biggest joke,
as we knew when we bought it that it was 1/2 inch
wider than the allotted space.
After a lot of cussing and swearing
(sorry, readers!)
we finally got it in.
Here you see it with the faucet that we also 
bought last year..
You can tell that the walls are not yet painted
nor has the caulking been done...


Here is the new fixture,
which replaced the junk that was there
(see yesterday's post).
And the walls are not yet painted,
evidenced, again, by the lovely wallpaper...


Here is the almost-completed room.
You will recognize the bird print on the wall
from Tuesday's post.
We used the toilet that was originally
in the master bathroom,
as it was in perfect condition.
(We purchased a slightly higher one for the master). 
I also re-used the sweet towel rack from
Birdsong.
The beadboard was painted with a basic
trim white, since the vanity was too white
to be up against my favorite color,
Simply White, used in the rest of the place.
The upper part was painted in another 
Glidden color which I will supply the 
name of later,
as that information is up there,
and I am home right now.
It is a light taupe-ish color,
which blended better with the vanity top
than any shade of grey would have,
though it is in the same tone as what
I used elsewhere in this home.
In the upper right you can see the raw framing
of the window, which we replaced on
our second trip.
Oh, did I tell you that there will be a window 
saga to come?...


I must confess, that aside from painting, 
I did not play much of a role in remodeling
this room.
But, I did have fun playing with 
this dingy old antique 
mirror that was being ignored in the attic
here at Plum Tree.
It was chippy white, but not in a good way.
So I taped it off...


...painted it with the same white semi-gloss
paint used in the rest of the room...


...and voila,
after turning it sideways
we had a pretty mirror that kind of matched
the room, but not too much.
Only enough to give it that cottage look
we desire...


By the way,
brushed chrome knobs came with the vanity,
so I sprayed them with oil-rubbed bronze paint
and they match everything else now.
This room is so small that there was not enough room
to step back far enough to take a picture of the whole thing!
You have to love it.

***************************************

Thanks for coming by.
As always, I so appreciate the time you spend reading my posts.
Have a wonderful day!


The Wren's Nest: The Guest Bathroom (Part 1)

Hello to all! I hope that you are having a great week.

When we went up to The Wren's Nest in April (the first trip of the season), we finally got on with remodeling the guest bathroom. To say that this room was small would be a gross understatement, so wiggling about in there trying to install beadboard, replace old flooring, and install 3-1/2 in baseboards was a real challenge for the Mister, since he did most of this work. We started by gutting everything to make may for the new.

I think that I shared some photos last year
of what this room looked like.
It still had the original harvest gold toilet, 
though you can see that the toilet seat had
been replaced.
The funny part was that though it used
a ton of water and took forever to fill,
it was actually in perfect condition...


Here is a very dark and bad photo of the old
aluminum awning window,
original to this 40-year-old trailer.
Don't you love the country blue valance
with the yellow stars on it?...


The medicine cabinet was particularly interesting.
The light was built into it,
and it was painted aluminum 
with sliding mirror-doors. 
Underneath it was a stick-on-the-wall
paper towel holder.
You would not appreciate the irony in this
unless you could have seen the four 
(yes, I said four!)
chrome towel holders that had been fastened 
to the walls.
How many towels would be needed in 
a half-bathroom that was little wider than
the toilet and had no shower?...


As with those in the master bathroom,
there was a harvest gold sink and counter top,
and original faucet with crystal knob
sitting on the built-in vanity.
The flooring was faux wood vinyl,
which was throughout the unit
and which we replaced last year
with laminate,
which you can see below
on the right outside the door...
 

Below you can see the wall after hubby removed
the toilet.
Gee, how can we tell that the wallpaper
(originally green and yellow as you see)
was painted cream, but not behind the toilet?...


And this is the corner after we ripped out the
old vanity.
The plumbing came in from the side
of the home,
which you see in the torn out portion below.
Mr. Perch is a fanatic about replacing 
old plumbing with shut-off valves. 
And yet more of the old wallpaper
(actually wallpapered wall panels,
which is what they did in those days).
On the floor you can also see
the base for the flooring that we were
getting ready to install...


Stay tuned for a look at how it turned out!

The Bird Book Print and an Old Picture Frame

After our recent community yard sale, we were stuck with quite a few things that didn't sell. Most were donated locally, but I did keep a few of the old picture frames thinking that I could diddle with them and use them down the road.

I still have a few places at The Nest that need a little decorating, so decided to put a few things together to bring up there, and here is one of them.

This was originally a bronze-brass metallic
wood frame.
I sprayed it with Rustoleum
in an oil-rubbed bronze color
(the same one that I used on the knobs
for the kitchen cabinets up there)...


...and left just a little of the original finish
showing through...

I recently discovered a source for vintage prints
that were cut from old books.
The shop sells at very reasonable prices,
and I don't have to tell you what some
sellers charge for these.

This one was the title page from a vintage
bird book.
The seller has a water colorist on staff,
and he, or she, gently colors some of the
illustrations, as was done with this one.
I made a copy of it,
(of course, saving the original)
and fastened it to a nice piece of burlap that
I then used to cover the cardboard that came
with the frame.
Vintage-looking prong fasteners
hold the print to the burlap...


Here is a close-up.
It was hard to get a good photo due
to the reflections on the glass...


It took about ten minutes to put the whole thing together 
while waiting for the paint to dry on the frame.
What could be better than this
for a vacation place called "The Wren's Nest"?!

***************************************

I had also ordered a few other prints from this seller,
and I will share them with you on a future post.
If you're interested in browsing this shop on eBay,
the name of the store is Interior Elements,
and you can find it here.

Have you created anything "on the fly" lately?

****************************************

Today I am linking with Wen's Simply Neutrals Tuesday Party
and you can find it here.
I hope that you enjoy your visit!