This is a good news day for you. There will be no more posts about The Wren's Nest until at least next April. I can hear you clapping already!
Just a couple of last notes, well, actually tips. As you well know by now, my husband and I are DIY folk, but by no means professionals at anything we do. A lot of what we get accomplished comes by way of learning by our mistakes, or, more often than not, by just fixing our mistakes.
Here is one of them, with a workaround that turned out kind of pretty.
When we were cutting the paneling for the
bathroom (see earlier post),
we obviously didn't measure correctly
to account for the electrical outlet.
Not once, but twice!
At this point, we were running out of paneling.
So, I thought about what I could create
to cover this boo-boo...
to cover this boo-boo...
This is a larger outlet box than normal.
The only switch plate that we could find
to fit it and cover the mess was this type,
but we didn't need the part of it
that was cut out for the switch...
I brought the switch plate to Walmart,
where I found this lovely and inexpensive
frame, making sure that the switch plate
would fit inside of it...
I then covered the switch plate
with pretty scrapbook paper
following and adapting a tutorial that I found
through Pinterest (what else?!),
coated it with Mod Podge,
and added a vintage rhinestone button
to hide the switch cutout...
This is what the switch plate then looked like
on the back.
I glued the button on, and also
fed a small piece of wire through the
back of the button, taping the ends to
the back for added stability.
At this point the switch plate was not glued to the
frame or burlap mat that came with the frame.
When we actually got ready to hang this all up
we decided that there was no reason to use the
mat, and it would have gotten in the way
of everything...
This is how it looked from the front...
We screwed the switch plate to the wall,
using the one screw on the right
that was needed for the actual outlet.
The two screws by the button were
just glued in for effect.
The frame was then attached to the wall
separately with wood glue,
upside down so as not to interfere with
the molding...
(Before hanging it up, Hubby did replace
the outlet with a new white one.
We have this thing about ugly old
outlets and switch plates.)
Too bad for this bad photo!
Who said that switch plates can't be
beautiful!
**********************************
And here is one quick tip. Have you ever tried to spray-paint kitchen cabinet knobs and gotten frustrated with the fact that they keep rolling around? You might find this helpful.
Original knob...
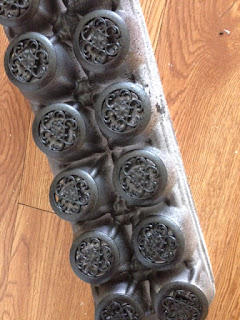
Punch holes in the bottom
of an egg crate,
insert the knobs, and
spray away darlings!...
Ready to be hung,
and so much cheaper than buying new
ones!!...
Norm Abram and Martha Stewart have nothing on us!!


Wonderful!! You are so clever Sue. This frame was a stroke of genius! : )
ReplyDeleteLooks very elegant and "like you meant to do that" all along~ I like the egg crate trick too; they work wonders for so many things - from storing sm pcs; to ideas like yours. Thanks for sharing! Karen O
Necessity is the mother of invention! Egg crates do come in handy. Thanks so much for taking the time to read these posts, Karen! Happy weekend!
DeleteNo! Martha and Norm have nothing on you! thanks for sharing...and I feel a little sad that I will not see any more from the Wren's Nest til April! I love reading about it and seeing home improvements!!!
ReplyDeleteThanks Nancy! I always think that maybe no one is really interested, as there are so many really great DIY blogs out there. For me, it is just a way of keeping track of what we do and when we do it. I love that you enjoy reading about it. Have a great weekend!
Delete