During the summer we spent a lot of time working on our little place in the mountains, The Wren's Nest, which we purchased last fall during the week that we were closing up Birdsong Cottage for the winter. This little old single wide mobile home is in the same mobile home park as Birdsong, and though seven years newer than Birdsong, having been built in 1976, it needed a lot more work since it had never been updated. Since we got it for a great price, it having come out of an estate sale, it was worth the effort since in the long run it will have more to offer us than Birdsong did. The park that it is in, though old, is wonderful and in a great section of Hendersonville, NC, where anything you could need to buy or do is just a few minutes away. So while the thought of buying such an old mobile home would be odd to most, it is pretty commonplace in that area. As the homes get fixed up with the new generation of retirees (like us), they tend to increase in value. Not to mention that there is a real sense of community because of the great people that live there.
In June, right after I completed the painting and he finished laying the laminate flooring and putting in the 4-inch baseboards, my husband ended up with a nasty wound on the bottom of his foot, and since we were up there when it happened, we ended up going to a wound specialist in Asheville. We developed a great rapport with that doctor, and consequently spent a lot of time up there. Because of the wound, Bob was in a cam boot most of the summer, and not allowed to drive. So we obviously couldn't do much of what we had hoped to.
Because we were back and forth most of the summer, I didn't have much time to post about our adventures, so here goes nothing!
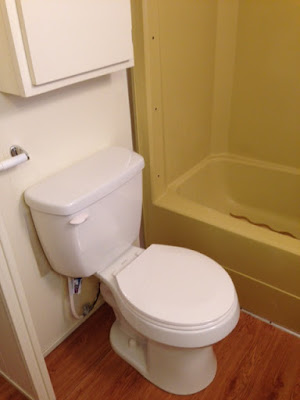
These first three photos show the bathroom
as it looked right before we took ownership
last November.
Here is the original harvest gold fiberglass
tub and surround.
This is the toilet that was in there.
Since it worked quite well,
and was fairly new,
we took it out and saved it
for the guest bathroom remodel,
replacing it with a new one
that is a little higher.
You can see the flooring,
which was peel and stick faux wood vinyl.
Bye bye.
Also, to the left of the toilet is a piece of
wall that juts out,
whose purpose remained unknown to us.
Also bye bye...
In April, during our first trip up here,
Bob took an ax to the tub and surround.
The only way he could get it out was to
remove it in pieces.
( I couldn't take photos of him doing that
because he doesn't appreciate my telling
him to pose while I shoot!)...
The focal point of this room is without a doubt the vanity
and tin medicine cabinets with the sliding door thingys.
The cup dispenser was one of a million or so items
that the previous seller had attached to the walls,
cabinets, doors, and everywhere else that 3M hooks would stick.
Particularly fascinating were the old timey faucets that when you
turned the water on scraped your knuckles on the low-hung
medicine cabinets.
Can you believe that the countertops,
which were originals,
were neither scratched nor chipped?...
So, when we went up in May, my Mother's day
was spent putting in the new bathtub.
Ever so much fun when you have no wiggle room.
Remember that in mobile homes a lot of this stuff
is put in at the factory,
with walls being added later.
So behind the tub you see the original paneling
that had never been painted,
and below it you see a section of the original
yellow and gold flooring,
which was covered by the old tub.
We had to rest the tub on an old chair
to be able to maneuver it in.
You see the hole for the plumbing to
the right...
Though a bad photo due to the light,
below you can see the delightful ceiling
above the mirror.
This was from a very old leak
that was revealed when we decided to take
down the flimsy bulkhead
that housed two very ugly globe lamps.
The rotted ceiling did not smell,
nor was it wet,
but it was brittle,
so we covered it up with something
a little decorative.
In this photo you can also see the original
wallpaper (top left near the rotted ceiling)
and the second go around of wallpaper,
just underneath it,
which covered only half of the walls.
(The rest of the walls were the old paneling).
We hung my little bedroom mirror in here
while we were working,
and made do with this hanging light bulb...
Here is a photo of the right corner above the vanity.
Old wallpaper from under the bulkhead,
new wallpaper underneath it.
My attempt on the left to see if dark grey
paint would cover it.
Naught! The paper was embossed!
My attempt to see if paneling was under
the wallpaper.
Naught! Just plywood!
So we backed away from wall design choices...
...and Mr. Perch decided to fiddle
with the plumbing,
with the goal being to add shut-off valves,
a luxury missing from each sink in this dump!
The fiddling did not go well and took three days
over two trips
to rectify.
Not easy when you have a bad foot.
Not easy when you can't be up there all the time.
Not easy when you are trying to fix bad
work done by those who just know enough
to be dangerous...
Hubby then covered the hideous ceiling that
was rotted under the bulkhead
( we suspected that the bulkhead was a
camouflage act)
with plywood (later painted),
and he hung two pretty hanging lights.
We then decided that we wanted a bead board look
on the walls,
and I felt that the best (cheapest!) way to accomplish
that was to purchase paneling
and install it over the awful wallpaper.
It was a light grey color and not fun to install,
and you see it behind the light below.
It went over about three walls.
And then had to be primed before I could paint it
without it all peeling off..
I cannot remember when I last had this much fun...
We then replaced the vanity top with what you see below.
These are the ones sold in the big box stores
that you cut to fit yourself.
We managed to get it done with no mistakes.
The sinks and faucets were also purchased similarly,
and really ended up looking lovely in the finished bathroom
considering that they were pretty inexpensive...
Here is a shot of the corner where that piece of wall
jutted out by the toilet.
Gone!
These two walls also still had their original
paneling...
Below is the completed vanity
(the old vanity was just painted,
as were the knobs that were on it),
and the first stage of the new flooring.
To the far left you can also see where Bob
trimmed out the corner seen in the photo above.
(I had finished painting the walls at this point)
The Wonderboard was recommended
by the guy in Lowe's.
It was able to go right over the old flooring
and provide an even surface for the tile to come...
And here is the tile showing a portion of
the newly painted walls.
Baseboards were not in yet...
In my next post I will share photos of how it all turned out.
If you are still awake after this post,
I thank you for staying with me.
If you are not awake,
I thank you for trying!


Oh.My.Word. Sue! You really did/do have your hands full! Having lived in a mobile home for a few years I completely understand and concur with what you are saying! I can see the glimpses here of the hard work put in and am anxious to see what updates you have finished! So, on to the next post : )! ~Karen
ReplyDeleteHi Karen. I'm glad that you understand. The owners of most of these homes only ever do the minimum to get by when something breaks. And we won't even talk about their sense of decorating! Different strokes for different folks, I guess. XO
Delete